
Chapter 3: Basic Tools

This chapter discusses some practical tools every developer should use, with a high level of proficiency. They aren’t the be-all, end-all of being a developer, but they are very good at what they can do.

Plain Text

They provide a compelling argument that using plain text is important. It can be structured (JSON, YAML) or unstructured. In either version, it should be written in a `human-readable` format, not just be human understandable. The difference here is that a random string of letters and numbers is understandable to a human, but it isn’t readable, where the reader can gain insights or understanding.

Shells

They advise having a bias towards using Shells versus IDEs as much as possible. They are the `workbench` for manipulating files. They can, of course, be customized to your preferences. For example, my shell in Terminal (macOS) will display the current folder and git branch in one line above the cursor.
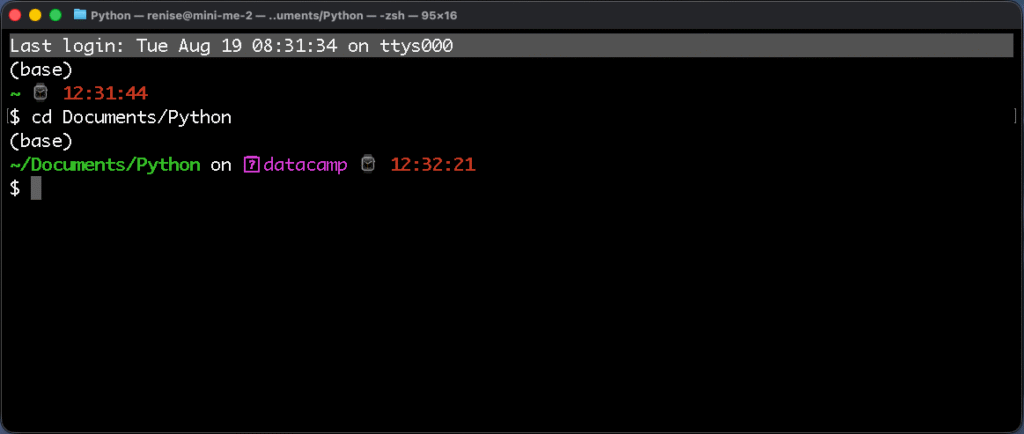
You can also use aliases to help automate repeated operations to avoid having to retype them manually. For example, I used ZSH at Amazon to create shortcuts for specific terminal commands and options to improve my workflow.

Another useful tip is to leverage command completion. I use command completion all the time, especially when working with Git. I can easily recall previous commands and do path completion when navigating folders and files in Terminal.

My training and work as an engineer at Amazon were more focused on learning to use an IDE (IntelliJ). There was some command-line work, but it wasn’t the bulk of it. As one engineer mentioned to me, today, it’s easier to use a chatbot to learn command-line prompts and shortcuts. We no longer have to memorize them.

Debugging

They offer some sage advice on how to approach debugging without panicking. When I was a new developer, it was definitely panic-inducing to get paged for an issue in a large codebase I was unfamiliar with. I can recall the feelings of helplessness even today. 

Their advice, “don’t panic!” 

Instead, start to develop a problem-solving strategy for how to squash bugs: 

  • First, develop a debugging mindset. Remind yourself that it’s only problem-solving
  • Start with a clean build. If the build isn’t clean, don’t even bother starting to debug.
  • Gather relevant data. Depending on the issue, it could be dashboards, logs, or user-reported information.
  • Reproduce them. Recreate the bug to help gain a better understanding of what’s going on and where to begin investigating.
  • Write a failing test before fixing a bug. This one is self-explanatory.
  • Figure out if it’s a crash, a bad result, or input-value sensitivity. Knowing which one is a good starting point.
  • Use binary chop. Similar to a binary search, halve the stack until you isolate the problem.

Binary Chop

I hadn’t heard of this methodology until now. It’s a simple idea that makes sense. Instead of trying to trace a stack with hundreds of lines of information, cut it in half. See if the problem occurs in that half, then continue dividing the stack until the bug’s origin is found. It’s the debugging version of a binary search method.

Many times, I remember seeing a stack trace of an issue at Amazon, consisting of hundreds of lines. This strategy would have been useful back then, but of course, hindsight is 20/20.

Process of Elimination

Identify whether the bug is in your code, a framework from a vendor, or the environment the code runs in. Don’t bypass testing simple lines of code because you assume it’s too simple to cause a bug. Such assumptions will cost time and effort that could be avoided. 

Engineer’s Daybook

One advice that I enjoyed reading is their advice to use an engineering daybook. In today’s parlance, it’s a bullet journal, or something similar. It’s a place where you can jot down and reference notes as you go through the day. Later, these can be referenced for a look back in time or to discover new ideas and solutions. I give a big plus one to this.

Conclusion

I found chapter three to be very practical, with tangible advice that an engineer can start implementing immediately. Most of the tools mentioned are free or easy to get. They do require time and commitment to reach a high level of fluency, but are worth the effort, even on a basic level.
Chapter 2: A Pragmatic Approach

I found this chapter to be insightful and can relate it to my experience as an engineer, both good and bad. The chapter discusses good design, DRY, tracer code, prototyping, and estimating. I’ll share what I learned along with my thoughts.

Easy To Change (ETC)

The chapter begins with a discussion on what makes good design. They emphasize the benefits of good design, including that it must be changeable without changing any adjacent, upstream, or downstream code. In essence, use ETC or make it easier to change by using techniques such as modularization and interfaces to keep responsibilities separate.

ETC is more than just applying the Single Responsibility Principle. *Thomas* and *Hunt* advocate that it’s a value for decision-making. It won’t tell you how to design and implement systems, but it will help you make better decisions between design and implementation options. 

When dealing with unknown paths or novel projects, their sage advice is to make it replaceable. That way, if a better design option is presented later, that chunk of code can be quickly replaced. In their words, your initial design or implementation decision “won’t be a roadblock” to implementing the better option. 

Finally, be sure to note the situation and reasoning in a journal and code to be able to understand and reflect on your decision later. This is wise advice for me. I didn’t keep meta notes, and I feel this bit of wisdom is helpful to grow as an engineer.

Don’t Repeat Yourself (DRY)

They emphasize that DRY, or Don’t Repeat Yourself, applies to both code and documentation. If a change has to be made in multiple locations, then the code isn’t DRY. For example, having a function where multiple lines use the same steps to perform a calculation. In this case, remove the repetition by moving those steps to a separate function that can be used by each operation. Even low-level operations such as number and text formatting should be converted to a reusable function call, rather than repeating the operation multiple times in the code. 

This also means that documentation in the code shouldn’t be a copy of what’s in the code. This will lead to the documentation and the code becoming misaligned in the future because, as the code changes, it’s more likely that the documentation won’t be updated. Instead, use documentation to highlight an exception, a known issue to fix later, or to explain an engineering decision. 

Duplication should also be avoided between APIs (internal and external) and data sources. The goal is to find a neutral standard to specify APIs or data.

Orthagonality

They introduce the concept of *orthogonality* in programming with an example of the systems used to control a helicopter in flight. The controls on a helicopter aren’t independent; moving one lever will affect how the other controls should be manipulated. You cannot move the cyclic to get it to move forward without having to adjust the pitch lever, throttle, and foot pedals. 

The interplay of a helicopter’s systems is an example of a non-orthogonal system where each is intricately intertwined such that you can’t adjust one without adjusting the others. This is not how code should perform.

Each system should operate independently of the other. This makes code changes easier, saves time, and reduces risk because an engineer will understand that they only need to create and test the change in one system (or subsystem). It also promotes component reuse, where new and creative combinations can be made in the future.

During the design process, maintain orthogonality by using implementation layers. That is, the user interface is developed separately from the data access layer, which is separate from authorization and any business logic. A quick check they advise is to ask yourself, ‘If I dramatically change the requirements behind a particular function, how many modules are affected?

Also, be mindful of how your design is decoupled from the real world. For example, using randomly generated IDs for user account IDs instead of real-world information such as phone numbers, because they can change, and you will not have control over them.

And of course, this also applies to documentation where content and presentation are separated. It is best to have a platform that handles the presentation layer, such as Markdown, so that you can focus on the content.

Tracer Code

An interesting tool they mention is to use tracer code. Tracer code is where a system is developed just enough to get each layer working together end-to-end to show that the system as a whole can be integrated. This is especially important for novel projects where the possibilities are unknown. The tracer code is developed in the same environment it needs to run in, within the same constraints. It gets from the requirement to an operational but simplified version of the system running quickly. From there, developers can add to each subsystem until all requirements are implemented.

It avoids the burden of developing all the requirements at once without anything to demo until much later. Tracer code helps to demonstrate to all stakeholders that the project is viable and will encourage buy-in and support for the rest of the implementation. Tracer code is skeleton system code that can be used to implement the rest of the functionality.

Prototypes

Prototypes, on the other hand, are meant to be disposable. It is a way to demo or work out a specific problem without producing production code. It can be done on sticky notes, a computer, or a small-scale model. The ultimate difference between tracer code and a prototype is that a prototype can be discarded.

Estimating

Finally, they discuss estimating and how to get a better handle on setting time frames for project task completion. They suggest referencing prior projects or talking to engineers who have experience with this type of project, which is important wisdom to have. 

They mention how to talk about and reference estimation to set expectations. For example, if a project is estimated to take 25 weeks to complete, set the duration to six months. That way, the expectation is to have it done in 5-7 months. This will provide 1-3 months of wiggle-room versus 1-3 weeks, which is a significant difference. 

They also suggest building a model of the steps needed to understand what needs to be done. The goal is to make sure you have a good understanding of how your team or organization develops projects.

They advise keeping a journal of your estimations to reference and reuse later. As an engineer, this is an area that I struggled with. It is challenging to set a task estimate of work you haven’t done before on a team that provides little guidance and shared estimating knowledge. It can feel daunting. 

They advocate for my preferred method of project task planning and estimation. This method broadly defines all but the initial tasks. Then, as project implementation progresses, progressively refine the remaining tasks in parallel. In my role at Amazon, I was expected to create a firm, detailed task plan as a new engineer, regardless of my experience and uncertainty, and then not deviate from that plan. This method meant that revisions to my timeline had a high negative impact without much guidance.

Conclusion

Overall, my previous experience resonated with what Thomas and Hunt advise. I honestly feel that this book should be a required reading for new engineers because it gives them access to wisdom gained from years of experience, whether their team can provide it or not. It is a way to build a strong foundation as an engineer that can be referred to and refined over time.

I am looking forward to reading each chapter of this book. Coming up next, chapter three, entitled The Basic Tools.

Pragmatic Programmer Notes #2

Continuing with chapter one, section seven (7) on communication. Thomas and Hunt offer advice on how to be a better engineer by communicating more effectively.

The section begins by advising that it’s “not just what you’ve got, but also how you package it”. They caution that even the best code or ideas are useless unless other people are aware of them.

Developers create various forms of communication, including in meetings, through written code, proposals, and reports. When preparing non-code communication, treat your native language like a programming language by honoring the DRY principle and leveraging automation. Automation in this case can include any documentation templates.

For code, inline documentation should focus on why a decision is made. It shouldn’t explain how because that’s what the code is for.

  • Know your audience: They caution, “just talking isn’t enough”. You must understand the needs and capabilities of your audience, and request audience feedback to gauge their level of understanding and engagement.
  • Know what you want to say: Create a plan for what you want to say to ensure it expresses what you want in all communication types, including verbal communication.
  • Choose your moment: Figure out if your audience is receptive to your ideas before you start sharing them by understanding their priorities.
  • Choose a style: Understand how your audience wants the information delivered – a formal document, quick details, or a verbal discussion.
  • Make it look good: A good-looking document matters, so take the time to edit and format your communication to make an impact.
  • Involve your audience: Get readers engaged early in the documentation process.
  • Be a listener: Listen to others as you would have them listen to you.
  • Get back to people: Whether it’s email, social media, or documentation comments, there’s no excuse not to respond.

Documentation Best Practices
They nicely devote a separate section for documentation, and as a fan of technical writing, it pleased me to see it.

  • Don’t waste time documenting how in your code, document why.
  • Comment source code to explain parts of a project or engineering trade-offs.
  • Plan your documentation from the start, not as an afterthought.

It’s generally understood that we all need to communicate better. It’s a persistent challenge given all the other priorities we face every day. But it’s worth taking the time to communicate effectively. These engineering communication tips are shared with a voice of experience from both authors.

Pragmatic Programmer Notes #1

I finally got the chance to start reading The Pragmatic Programmer, 20th Anniversary Edition by David Thomas and Andrew Hunt. These are my initial notes from this first reading.

These are my rough notes and are intended for me to reflect on what I read. I capture the key points that I feel are important to pay attention to.

Attitude and Style

  • Think beyond the immediate problem.
  • Place it in a larger context.
  • Seek the bigger picture.

Team Trust

  • The team needs to trust me.

Own It

  • Look for risks beyond my control.
  • Have contingency plans for risks.
  • Know my options such as: prototyping, testing, automation, and learning.

Software Entropy

  • Fix ‘broken windows’ quickly.
  • Document issues as soon as they are known.
  • Don’t do additional harm while fixing additional issues.

Handling Change

  • Be a catalyst for change.
  • Make reasonable asks.
  • Avoid a narrow focus.
  • Know the big picture.
  • Use situational awareness.

Software Quality

  • Write ‘good enough’ software.
  • Meet user and system requirements.
  • Let users participate.
  • Consider modularization or microservices.

Keep Skills Fresh

  • Learn a new language annually.
  • Read a technical book monthly.
  • Take classes.
  • Participate in user groups.
  • Try coding in different environments.
  • Read current news and events.

French Language Assistant

Google Gen AI 5-Day Intensive – Capstone Project

This post describes my goals and learnings from completing the capstone project for Googles Gen AI 5-Day Intensive Course, hosted by Kaggle.

Resources to Know

Here are some important resources to use while reading this post:


Introduction

When learning a new language, as I’m currently pursuing with French, once you get past the basics of conjugation, grammar and pronunciation, becoming fluent requires a deeper understanding of the language. It is necessary to not only know how to speak the language but also know the nuances of a langauge including common usage patterns, useful related phrases, and linguistic and historical facts. How certain phrases are commonly use. What does it sound like spoken versus written. What language rules cause a change in spelling and word groupings. These are all insights that would be helpful to me as a second language learner to have when studying a language.

For example, in French the phrase “pas de” doesn’t change even if it is followed by a plural noun. It is used as “pas de viandes” as well as “pas de fromage”. This and other similar examples enrich and enhance french-language learning. A language learner has to be able to take notes on these variations and practice them.

Goals

During my studies, I often have to use multiple websites and apps to get the additional information I need to understand the grammar, spelling, and language rules to name a few. Often, It’s more helpful to get additional details and examples.

The goal of my project was to create a French language advisor to help me achieve my goal of being fluent in the French language. Currently, I am working to be fluent in French and I’m currently at CEFR 43 where I can read, write and speak about every things. At this point in my learning, it’s important to understand and explore the language nuances to foster thinking “in French”, versus just learning grammar, vocabulary, and conjugations.

I wanted to see if a chatbot could eliminate the need for multiple apps and websites to get the information I need.

The goals were to:

  • Create a model that can use an agent, Google Search grounding, and retrieval augmented generation (RAG) to supplement and support my French language studies
  • Have the model offer suggestions, ideas, examples and interesting information and facts about the French language
  • Include something interesting, funny and/or popular culture references

Features

The primary feature of the model was to give me the ability to ask any question and receive results that may refer to embedded texts (RAG) or Google search results. I needed the ability to input a word, phrase or sentence in French, and receive an appropriate response, preferably in French.

Chatbot features

  • Get interesting French language details including grammar, composition, and spelling with Google search grounding.
  • Create a domain-specific LLM: Add French language notes and documents
  • Use existing texts as input for RAG to reference French textbooks and documents
  • LangGraph to manage the conversation and its details

Implementation

This solution leverages LangGraph, Gemini’s Google Search, RAG and functions. The steps used to implement this solution are outlined here. The initial stages of my project were to create a basic graph that included Google searches, client instantiation and creating embeddings. Once that was tested then add and integrate RAG to provide a richer learning experience.

  • Prepare Data: The PDFs for RAG are French-language textbooks that were imported then converted to Documents (object type) before embedding them using Google’s models/text-embedding-004. Once the embeddings were created, they were stored in a Chroma vectorstore database.
def create_embeddings(text: str) -> List[float]:
    """Create embeddings for a given text."""
    response = client.models.embed_content(
        model=EMBEDDING_MODEL,
        contents=text,
        config=types.EmbedContentConfig(task_type="semantic_similarity"),
    )
    return response.embeddings

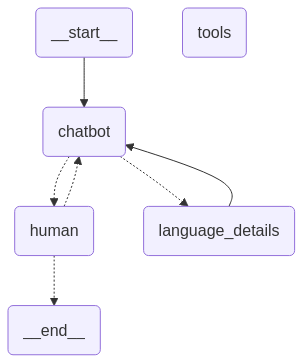
  • Build Agents & Functions: The chatbot consists of LangGraph nodes, functions, conditional edges and edges as seen in this mermaid graph.

  • Search grounding: Google search is used to return augmented results such as common usage examples and conjugations. The wrapper used is ChatGoogleGenerativeAI. It’s part of the langchain_google_genai package. It was configured with temperature and top_p.
llm = ChatGoogleGenerativeAI(
    model=CHATBOT_MODEL,
    temperature=TEMPERATURE,
    top_p=TOP_P,
    timeout=None,
    max_retries=MAX_RETRIES,
    safety_settings={
        HarmCategory.HARM_CATEGORY_DANGEROUS_CONTENT: HarmBlockThreshold.BLOCK_NONE,
    },
)

  • LangGraph Nodes: This was the most challenging for me as I had to first learn LangGraph beyond the codelabs to understand it. Once I understood, I was able to create and sequence the nodes and edges to get the model behavior and output that I wanted.
# Create and display the graph
workflow.add_node("chatbot", chatbot)
workflow.add_node("human", human_node)
workflow.add_node("tools", tools_node)
workflow.add_node("language_details", language_details_node)

# Chatbot may go to tools, or human.
workflow.add_conditional_edges("chatbot", maybe_route_to_tools)
# Human may go back to chatbot, or exit.
workflow.add_conditional_edges("human", maybe_exit_human_node)

# Define chatbot node edges
workflow.add_edge("language_details", "chatbot")

# Set graph start and compile
workflow.add_edge(START, "chatbot")
workflow_with_translation_tools = workflow.compile()

Reflection and Learning

Prior to participating in the Google Gen AI 5-Day Intensive, I was unfamiliar with LangGraph, RAG, and agents. Now, I understand the flexibility and promise of LangGraph, RAG and agentic LLMs to allow models to be more flexible and relevant.

Some of what I’ve had to learn are following:

  • The types Gemini models I can use for embedding and the chatbot. In this case, I used the text-embedding-004 embedding model without experiencing any issues.
  • How to configure chatbot and embedding clients. Both clients were easy to configure and were set once and done.
  • How Google AI can be used in a LangGraph graph. I used two major packages, GoogleGenerativeAIEmbeddings and ChatGoogleGenerativeAI. Using either package was easy because the API and code documentaion was very good.
  • The difference between conditional edges and edges and how to create them. This was a bit tricky to decide what should be a tool versus a function for a conditional edge, versus a node. I also had to consider which logic should be place where and how the output should be handled. It took several graph iterations to get almost the way I like it. For the purposes of the capstone, it works as I intended.
  • How to import and extract text from PDFs. Importing and extracting text from PDF files was easy, as long as the PDF contained actual text and not images. To keep the scope of the project within my timeframe, I only wanted to work with PDFs that contained text.
  • How to embed documents for RAG contexts. Document embedding took several minutes for three decent-sized PDFs. It was the most time-consuming part of testing. It’s easy to see where as the set of documents I embed grows, more time and resources will be required.
  • Creating a Chroma vectorstore database. Creating and retrieving the vectorstore contents was fairly straightforward. It worked consistently locally and in the Kaggle Notebook.
  • Creating, updating and accessing a graph’s State object. I would have liked to have more time to master the state object but I was able to understand enough to make it work for my project. I would have liked to customize the state more but didn’t have the time to do so. I did find it to be a convenient resource to access messages no matter where it was invoked in the graph.
  • Create multiple tools and nodes to be used in the graph. I knew what tools I wanted to include based on the resources and tools I currently use when studying French. The goal was to consolidate the information I receive from multiple sources into a single one. But, there are other tools that would enrich my learning. For example, the ability to get rich text and image responses.
  • Using a prompt template to create and use basic prompts. I didn’t get as much time to investigate creating and using PromptTemplates. I know they could be useful for managing and transforming user input and I will be exploring them further beyond this project.

In addition, since I wrote the code locally in Zed, it took some time and effort to transform the code for a Kaggle notebook. One of the issues I had was that the dependencies initially installed in Kaggle’s environment caused import and dependency resolution errors. It took some time to make sure that the dependencies that worked locally were the same on Kaggle. In hindsight, I’m glad I developed it locally versus starting in a notebook

The Bigger Picture

Thinking beyond this capstone project, language learners need a wise companion to provide information and guidance. The companion would be a language note-taking app with an AI companion that would make suggestions about language rules, common usages, examples and comparisons. While taking notes, or when asked a question, an AI companion would be displayed in a sidebar with context rich details, and unique information and historical facts. This way, as they learn, they get to consider and contrast what they’ve learned. This would create a richer learning environment to motivate and encourage fluency. It can include images too.

This project is about taking the first steps to creating such a companion that will use the keywords, phrases and sentences I input to give me more context and nuance about it’s meaning, common usage patterns and interesting cultural and historical facts. It’s about going beyond the basics to to become immersed in French, especially if you don’t get to live in or visit a francophone country.

Ultimately, it can be developed into an AI-enabled, context-aware application. The AI integrated into the app would be a wise language advisor to help me learn the language. This would be similar to what happens currently with AI-enabled coding apps such as Zed, but more engaging. The AI assistant would remain aware of what I’m typing and offer context-rich suggestions. It would also allow the user to provide instruction at the start of the session for what their learning target is. Once the AI has this, it can then provide a richer learning experience.

This chatbot is the first step in realizing this vision. I can now input anything in french get a variety of details about it, including making additional requests for grammar, gender, and popular culture details.

The next steps for my French language assistant is to continue refine and update the graph, then create a user-friendly interface, before considering an app or website.